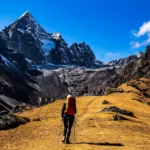
Now Reading: Vereda do Larano: Complete Hiking Guide to Madeira’s Most Scenic Coastal Trail
-
01
Vereda do Larano: Complete Hiking Guide to Madeira’s Most Scenic Coastal Trail
It delivers that “edge-of-the-island” feeling. You’ll find dramatic cliffs, wide Atlantic horizons, and a historic footpath that still feels wonderfully wild, without requiring alpine-level fitness.
Locals once used Vereda do Larano as a practical connection between communities; today it’s a bucket-list coastal walk linking Machico and Porto da Cruz, with the iconic Boca do Risco viewpoint as its signature moment.
This guide is written for real travelers planning a Vereda do Larano hike in 2026: beginners who want clear expectations, solo hikers who need safety and logistics, couples chasing sunset views, and photographers looking for the best light and compositions on the cliffs.
It’s also for anyone typing “vereda do larano madeira” or “vereda do larano hike” into Google and wondering why the stats and start points don’t always match, because there are a few popular route variations, and the “best” one depends on your transport plan and comfort with exposure.
Along the way, you’ll learn exactly where Vereda do Larano is, how to get there (car, bus, taxi/TVDE), how to choose one-way vs. out-and-back, what the trail is really like underfoot, what to pack, where the best photos happen, and what to do after you finish in Machico or Porto da Cruz.
Quick overview of Vereda do Larano
If you want the “at-a-glance” version before diving into details, here’s the most practical snapshot for planning a Vereda do Larano hike.
Most common full-route stats (Machico → Porto da Cruz, point-to-point): 12–13 km, typically around 4 hours moving time for many hikers, with roughly 300 m (about 1,000 ft) elevation gain, and difficulty often described as easy-to-moderate—but with important cliff exposure that makes it feel more serious than the numbers suggest.
One popular “shorter highlight” variation (Cabo de Larano road-end → Boca do Risco → return): 10.6 km round trip, 2.5–4 hours, 250 m ascent, and generally easier on the legs because you’re focusing on the higher, more scenic section.
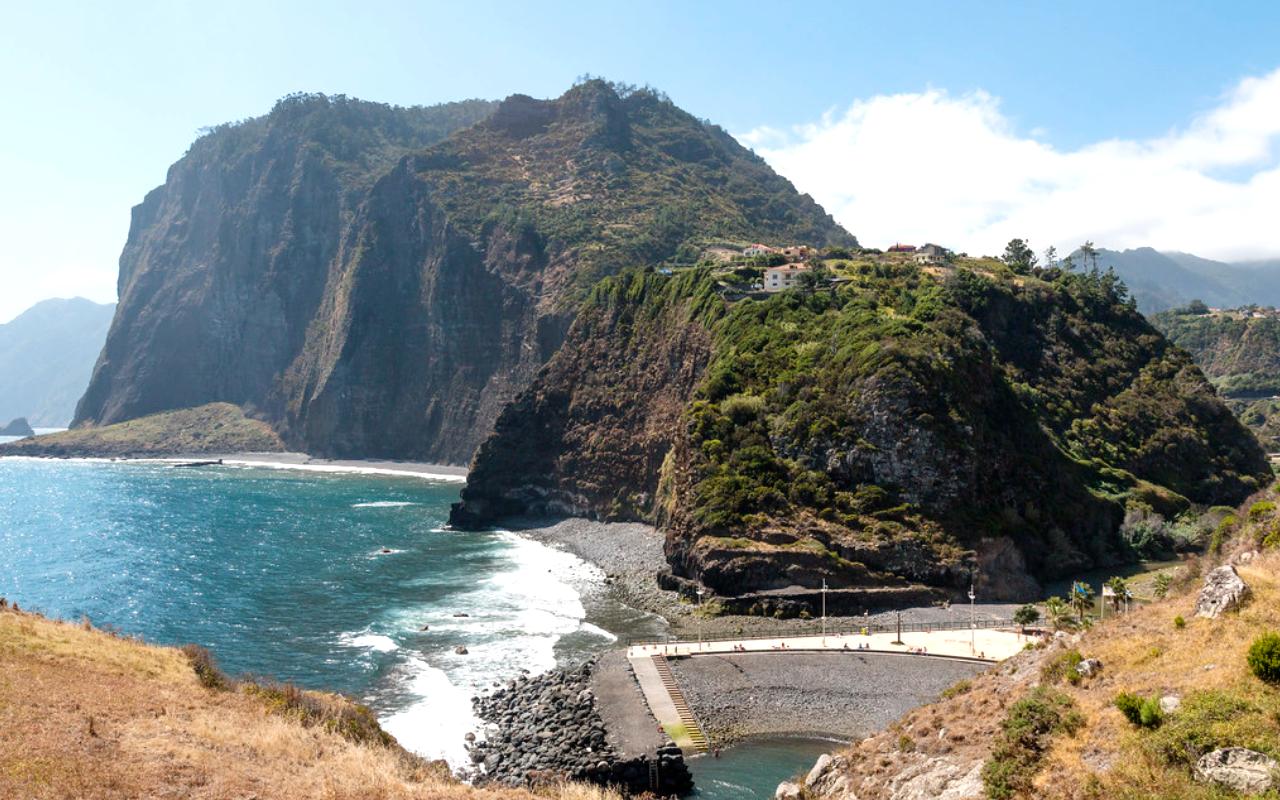
The highlight most people remember: Boca do Risco, a natural viewpoint high above the northeast coast (often cited around the 300–350 m range depending on route and measurement) where the ocean and cliffs open up in full panorama.
Trail type: a coastal cliff walk with sections of levada/forest at the beginning (or end), then a narrow cliffside traverse that can be exposed and windy.
Safety snapshot: This is not an official PR (classified) trail, and while it’s widely used and generally maintained, parts are open and unprotected, with real drop-offs. It’s a poor choice for anyone who freezes up with heights.
A key 2026 note (important context for Madeira hiking in general): since January 1, 2026, Madeira introduced mandatory reservations for classified PR trails via the official SIMplifica system.
This doesn’t automatically apply to Vereda do Larano because it’s widely described as not an official PR trail, but you should understand the system if you plan to combine Larano with PR hikes during your trip.
(If you’re searching “vereda do larano madeira” in 2026, this overview is your “ground truth” starting point, with the rest of this guide explaining how to make it smooth, safe, and photo-worthy.)
Where Vereda do Larano is and how the route is laid out
Vereda do Larano runs on Madeira’s northeast side, connecting the Machico area to Porto da Cruz along steep coastal slopes above the Atlantic. The classic “full experience” is a point-to-point hike that starts in Machico, climbs gradually via levada/forest paths to Boca do Risco, then continues along the cliffside towards Porto da Cruz.
Orientation and mental map
Think of the Larano route as two different worlds stitched together:
The inland/levada approach out of Machico feels like “green Madeira”—terraced hillsides, irrigation channels (levadas), and a steady climb that warms your legs without punishing you.
The cliff traverse after Boca do Risco is the “coastal drama” section: narrow trail, big ocean views, and the sensation of walking on a natural balcony.
This is why people call Vereda do Larano one of Madeira’s most scenic walks, but also why the hike isn’t for everyone, even if the elevation gain is modest.
Starting points you’ll see online
When planning a Vereda do Larano hike, you’ll see multiple “start” pins because hikers choose different logistics:
Machico start (classic one-way): Many guides reference starting near Machico by the old tunnel toward Caniçal (“Tunnel Caniçal”), then following the levada (often referenced as Levada do Caniçal) up toward Boca do Risco.
Porto da Cruz side start (common out-and-back): Another popular start is up above Porto da Cruz, accessed by driving or walking up roads like Caminho do Cabo de Larano; this is often used for the shorter “highlight” out-and-back to Boca do Risco.
So if your “vereda do larano madeira” search results disagree on distance, it’s usually because one person is describing the full town-to-town hike, and another is describing the Cabo de Larano out-and-back.
Nearby base city: Funchal
Most visitors base themselves in Funchal, then day-trip to Machico or Porto da Cruz for the hike. That’s practical because Funchal has the island’s biggest transport hub and the widest choice of accommodations—but it does mean you should plan transport before you lace up your boots, especially if you want to do the hike one-way.
How to get to Vereda do Larano in 2026
Transport logistics are the make-or-break detail for a great Vereda do Larano hike. The trail itself is straightforward; getting to the right start and from the right finish is what trips people up, especially solo travelers.
By car
Driving is the most flexible way to reach Vereda do Larano, but it also creates the biggest “one-way puzzle”: your car will be at one end, and you’ll finish at the other.
Driving times for planning: Funchal to Machico is about 22.6 km and roughly 20 minutes by car (Rome2Rio estimate). Funchal to Porto da Cruz is about 31.3 km and roughly 28 minutes by car (Rome2Rio estimate).
Parking reality: At the Porto da Cruz/Cabo de Larano access, parking can be very limited; some guides describe a small turnaround area and roadside parking on steep roads, so arriving early reduces stress and avoids blocking locals.
Car strategy that works well: Park in Machico (finish logistics are easier from Porto da Cruz), hike Machico → Porto da Cruz, then return to Machico by bus or taxi/TVDE. This keeps your “must-catch” transport at the end of the hike, when you can judge your timing. It’s a simple way to make a vereda do larano hike feel relaxed instead of rushed.
By public transport
Madeira’s bus system is more useful than many visitors expect, and the Vereda do Larano corridor is one of the areas where public transport can genuinely support a one-way hike.
Context for 2026: Madeira’s bus network has been unified under the SIGA umbrella (with timetables and planning tools available through SIGA), and there are dedicated resources like the “Madeira Bus” app for navigating routes and schedules.
High-value routes for Larano logistics (cross-check on your travel day):
Funchal → Machico: Rome2Rio lists a direct line 113 bus from “Funchal – Terminal SAM” to “Machico – Terminal Rodoviário,” with an estimated journey of around 50 minutes and typical fares of around €2–3.
Funchal → Porto da Cruz: Rome2Rio lists a direct line 208 bus from “Funchal – Terminal SAM” to “Porto da Cruz,” with an estimated journey of around 1h 5m and typical fares around €2–3.
Porto da Cruz → Machico (to retrieve a parked car): Rome2Rio indicates a direct bus (also listed as line 208) with an estimated journey of around 20 minutes and fares of around €2–3.
SIGA also lists routes like 53 (visible in SIGA timetables). This is useful as a backup option depending on your exact stop and day.
Practical bus tips for a smooth “vereda do larano madeira” day: plan around fixed departure times (don’t assume metro-style frequency), and screenshot the relevant timetable/route plan before you lose reception. Even older hiking resources stress that bus times can be irregular, so checking in advance is part of hiking responsibly here.
Taxi, private transfers, and TVDE apps
Taxis are the simplest way to solve the one-way problem for Vereda do Larano: hike from one town to the other, then taxi back to your car (or back to Funchal).
Rome2Rio’s typical taxi estimates give you rough planning ranges, for example, Porto da Cruz → Machico around €21–25, and Funchal → Machico around €40–50 (meter rates and time of day can affect this).
If you prefer an app-based ride (TVDE): local reporting and Uber’s own communications indicate Uber returned to service in Madeira in late December 2024, and Uber published operational guidance specifically for Madeira.
Bolt operates in Madeira, and Bolt’s own city listing includes Madeira (useful if you want to confirm service availability before relying on it for a one-way plan).
For most travelers, the safest takeaway is: treat taxis/TVDE as a convenience option rather than a guarantee at any exact time. If you’re hiking in shoulder season or late afternoon, have a backup plan (bus timetable screenshot, or a pre-arranged pickup). That’s especially relevant if you’re doing a solo vereda do larano hike and don’t want to be stranded in a quiet area after sunset.
Vereda do Larano route breakdown
Boca do Risco
This section is the heart of the guide: what you’ll actually experience, step by step, on Vereda do Larano.
I’ll describe the classic two-part route from Machico to Porto da Cruz, because that’s what most travelers mean when they say they did the Vereda do Larano hike—and it matches the most common “must-see” storyline: levada/forest → Boca do Risco → cliff traverse → Porto da Cruz.
Machico to Boca do Risco
Typical distance/time expectations: On the full hike, you’re looking at a total of roughly 12–13 km overall; the Machico-to-Boca section is the build-up that earns you the viewpoint and sets the rhythm.
What it feels like: You start in a more settled landscape—near Machico’s access points, then follow levada pathways and trails that gradually pull you away from town. It’s generally accessible terrain at first, designed more for movement than drama, which makes it ideal for warming up and getting your pacing right.
Navigation: You’ll see references to Levada do Caniçal, and the idea is consistent across sources: follow a relatively flat levada start, then take a signed/visible path uphill toward Boca do Risco.
Moment-to-moment highlights: As you climb, the coastline begins to tease itself through gaps in the trees. Then, at Boca do Risco, the view fully opens up. Many hikers treat this as a turnaround point (especially on out-and-back variants), but if you’re doing the full Vereda do Larano crossing, this is where the hike changes character.
A note on the name: One hiking reference translates Boca do Risco as “dangerous pass,” which captures the idea that you’re arriving at a high coastal notch where terrain and exposure become more serious.
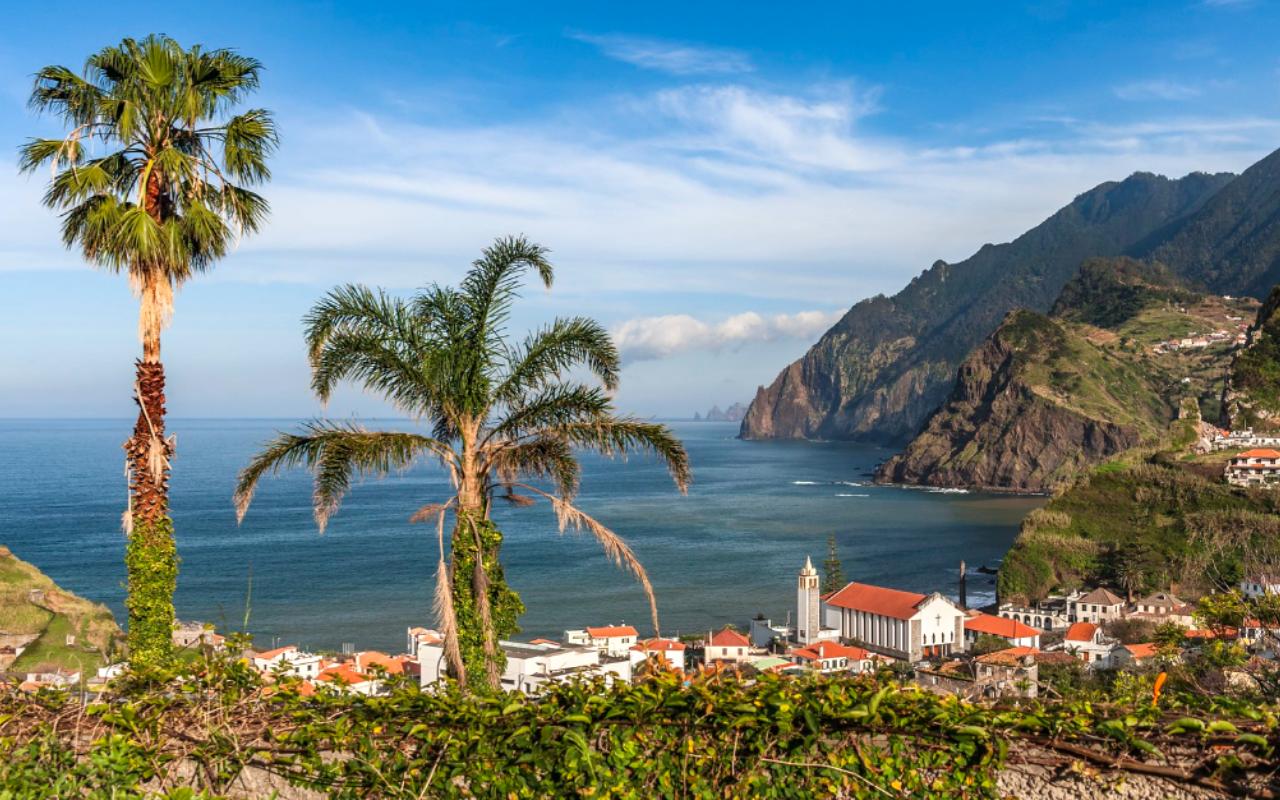
Boca do Risco to Porto da Cruz
If the first section is a scenic approach, the second section is why Vereda do Larano is famous on social media.
Trail personality shift: Past Boca do Risco, the route becomes narrower, more exposed, and more “coastal cliff” than “forest walk.” Several guides emphasize that this portion can be open and without protective barriers in places, so confident footing and comfort with heights matter more than cardio fitness.
What you’ll see: sweeping Atlantic views; steep slopes dropping away beneath you; and the kind of rugged coastline that makes Madeira feel like a vertical island rising straight out of the sea.
Landmarks to watch for (especially useful for photographers and “am I on track?” reassurance): – Cabo de Larano viewpoint area and an old cable car station are often mentioned on the Porto da Cruz side, adding a bit of historic-industrial texture to the hike.
Maiata Beach is a common finish/nearby point around Porto da Cruz; it’s known for strong waves and is popular with surfers, an excellent place to decompress after a vereda do larano hike if the sea conditions are calm enough to enjoy from shore.
Finish feeling: Dropping into Porto da Cruz feels like arriving at a different Madeira, more rugged, more Atlantic, more north-coast energy. It’s a satisfying endpoint because you can actually reward yourself with a village experience (coffee, food, a stroll) instead of simply turning around and retracing steps.
Route variations you’ll see recommended
Because Vereda do Larano is widely described as not an official PR trail, hikers treat it as flexible, choosing the “best” variation for their time, transport, and confidence.
The classic one-way (Machico → Porto da Cruz): This matches the popular story arc and is often described around 12–13 km with 4 hours moving time and easy-to-moderate effort (with the important caveat of cliff exposure).
The “highlight-only” out-and-back (Cabo de Larano road-end → Boca do Risco → return): Great if you’re short on time or don’t want to solve the one-way logistics. It’s often described as a 10.6 km round trip, 2.5–4 hours, and a relatively easy effort.
If you searched “vereda do larano madeira” and saw different distances, now you know why: people are describing different start/end choices, not contradicting the same route.
What to expect on the trail, difficulty, and safety
This is the section that keeps a beautiful Vereda do Larano hike from becoming a stressful day.
Terrain and elevation reality
Underfoot variety: Expect a mix, levada paths, and forest trails early (especially from the Machico side), then narrower dirt paths carved into steep slopes along the coast.
Elevation: The numbers are manageable for most active travelers. Common full-route stats include approximately 13 km with around 300 m gain, and another guide lists an altitude range of roughly 20 m up to mid-300s on the route.
But here’s the key truth for “vereda do larano hike” planning: difficulty here is less about steep climbing and more about exposure. Multiple sources point out that some sections have rails, but are mostly unprotected or without guardrails, making it unsuitable for hikers who are uncomfortable near drop-offs.
Is Vereda do Larano beginner-friendly?
Cardio-wise, it can be beginner-friendly: the elevation gain is moderate, and the route is often described as not particularly demanding in terms of steepness.
Psychology-wise, it depends: if “cliff edge” imagery triggers anxiety or dizziness for you, choose a different hike. Even guides that call the hike “easy” still explicitly caution people with a fear of heights due to sections with near sheer descents without guardrails.
Children: Some sources say it can work for families with hiking experience, but emphasize exposure and big drops as the deciding factor—meaning it’s not a casual “stroller-friendly” outing and not ideal for very young children.
If you’re a beginner who still wants a “vereda do larano madeira” experience, the safest compromise is to do a shorter out-and-back segment from the Porto da Cruz side: you can turn around at any moment that feels too exposed, and you won’t be committed to reaching a far endpoint.
Safety tips and what to check before you go
Weather and closure culture: Madeira takes hiking safety seriously—especially after storms. Authorities close classified PR trails during weather warnings, and the Regional Civil Protection service has published closure notices advising visitors to avoid risk behavior and follow official instructions.
Even though Vereda do Larano is commonly described as not an official PR trail (so it may not show up in the PR status list), you should still treat the same principles as non-negotiable: do not hike exposed coastal paths in strong wind or heavy rain, and avoid any section showing fresh rockfall or collapse.
Emergency readiness: In Madeira, the emergency number is 112. The Madeira Regional Civil Protection service recommends that when calling 112, you clearly communicate: where you are, what happened, and who is involved (number of victims and symptoms).
Respect “not official” reality: Because Vereda do Larano is widely described as non-official, don’t assume PR-style signage, guardrails, or rapid maintenance everywhere. Your own judgment is part of the safety system on a Vereda do Larano hike.
What to pack
Madeira’s tourism authorities emphasize that proper preparation makes all the difference, and 2026 hiking guidance highlights planning and responsible behavior in natural areas.
For Vereda do Larano, pack for exposure (sun + wind) and self-sufficiency (there are no guaranteed facilities mid-trail):
Essentials for every Vereda do Larano hike: – Water and snacks (enough for several hours; don’t rely on finding anything on trail).
– Proper footwear with grip: the trail can be dirt, can be slippery after rain, and some sections are narrow and uneven.
– Sun protection: hat and sunscreen (coastal sections can be bright even when inland is cloudy).
– Windproof layer: the northeast coast can feel dramatically windier than sheltered areas.
Optional but smart: – Trekking poles if you like extra stability on narrow or descending sections (especially if you finish by dropping into Porto da Cruz).
– Offline map + power bank (navigation confidence is a safety tool, particularly for solo travelers).
– A camera with a secure strap (you’ll want photos; you don’t want to fumble near drop-offs).
If your search query is “vereda do larano madeira,” this packing list is the difference between “wow” and “why didn’t I bring a jacket?”
Best time to hike Vereda do Larano and where to take photos
Porto da Cruz
Seasonal timing: what 2026 travelers should expect
Madeira is famous for a mild climate, and the official tourism board notes average temperatures of roughly 15 °C (winter) to 25 °C (summer), supporting hiking year-round.
However, microclimates are real: the same official guidance emphasizes that conditions vary across the island (mountains vs. coast), and that even if a morning is overcast in one place, it can be sunny elsewhere. That’s why checking the weather for your specific trail area (northeast coast) matters.
A seasonal breakdown that matches how Vereda do Larano feels:
- Spring: Often the best blend of comfortable temperatures, greener landscapes, and good visibility—excellent for a photogenic Vereda do Larano hike.
- Summer: Bright, clear coastal views are common, but bring more sun exposure (and sometimes haze). Start earlier and carry more water.
- Autumn: Warm but calmer feeling; great light angles later in the day, and often a sweet spot between summer crowds and winter instability.
- Winter: Still hiker-friendly in Madeira’s climate framework, but the risk of heavy wind/rain affecting exposed trails increases, and you should be more conservative about turning back on cliff sections.
Best time of day: sunrise vs. sunset
Golden hour on Vereda do Larano is spectacular because you’re photographing a high-contrast coastline, dark volcanic rock, bright sea reflections, and layered ridgelines.
Visit Madeira provides approximate sunrise/sunset ranges by season (useful for planning a start time): for example, in spring, sunrise is around 07:00 and sunset around 20:00, while in summer, sunrise can be around 06:15 and sunset around 21:00.
Practical strategy: If you want the classic “blue ocean + textured cliffs” look, go in the morning when the air is often clearer. If you want warmer tones and dramatic shadows on the cliff faces, aim for late afternoon, but plan transport so you’re not depending on a last bus after dark (a common stress point for a one-way vereda do larano hike).
Best photo spots on Vereda do Larano
Boca do Risco viewpoint: the signature panorama and the most reliable “wow” photo location on the entire Vereda do Larano route. Many route descriptions frame this as the emotional peak of the hike.
The cliffside traverse after Boca do Risco: this is where you get that “coastal balcony” composition—trail line leading through the frame, ocean far below, and layers of rugged coastline. Multiple guides highlight this as the most dramatic stretch, and it’s why “vereda do larano madeira” searches are filled with cliff photos.
Cabo de Larano / old cable car area: a distinctive subject that adds story—human infrastructure clinging to steep terrain—and often appears in guides as a recognizable landmark.
Near Porto da Cruz (finish energy): if you continue toward Maiata Beach, you can close your photo narrative with surf culture and wave-focused scenes—Maiata is known for excellent waves and is popular with surfers.
Photography tip that matters more than gear: on exposed trails, always prioritize stability over “one more step for the shot.” If you have to lean toward a drop-off to get the image, it’s not worth it—especially on a windy Vereda do Larano hike.
One-way vs round trip, nearby things to do, where to stay, and comparisons
This final planning section ties everything together so you can choose the best version of Vereda do Larano for your travel style and Madeira itinerary.
One-way vs. round trip: which is better?
For most travelers, one-way is the best overall experience: you get progression (Machico → cliffs → Porto da Cruz), you don’t repeat the same scenery, and you end your vereda do larano hike in a village where you can celebrate with food, rum, or a sea-view walk.
Why people choose round trip anyway: If you’re driving and don’t want transport complexity, an out-and-back from the Porto da Cruz side is a clean solution that still delivers the scenic “highlight” section, and Boca do Risco.
My rule of thumb for “vereda do larano madeira” planning: – Choose one-way Machico → Porto da Cruz if you can commit to a bus/taxi return plan and you want the full narrative. Choose out-and-back if you want maximum flexibility and the ability to turn around the moment exposure feels uncomfortable.
Vereda do Larano for different travelers
Couples: This hike is ideal for couples who like shared “wow” moments. Boca do Risco is a natural pause point for photos and snacks, and finishing in Porto da Cruz sets you up for a relaxed coastal afternoon around beaches and local culture.
Solo travelers: A solo Vereda do Larano hike is doable, but treat it like a serious outing: carry an offline map, don’t push through strong wind on exposed sections, and know the emergency protocol (112 and clear location details).
Families: Consider your child’s hiking maturity, not their age. The cliff exposure is the gating factor. Some families do it successfully, but the route is repeatedly described as exposed with significant drops, so it’s not a “casual stroll” with young kids.
Things to do near Vereda do Larano
Machico: Before or after your hike, Machico Bay is worth the time. The tourism board notes Machico’s significance as the landing place of Madeira’s first navigators in 1419, and describes the bay’s mix of pebble beach and imported yellow sand, plus marina and promenade—perfect for an easy recovery walk.
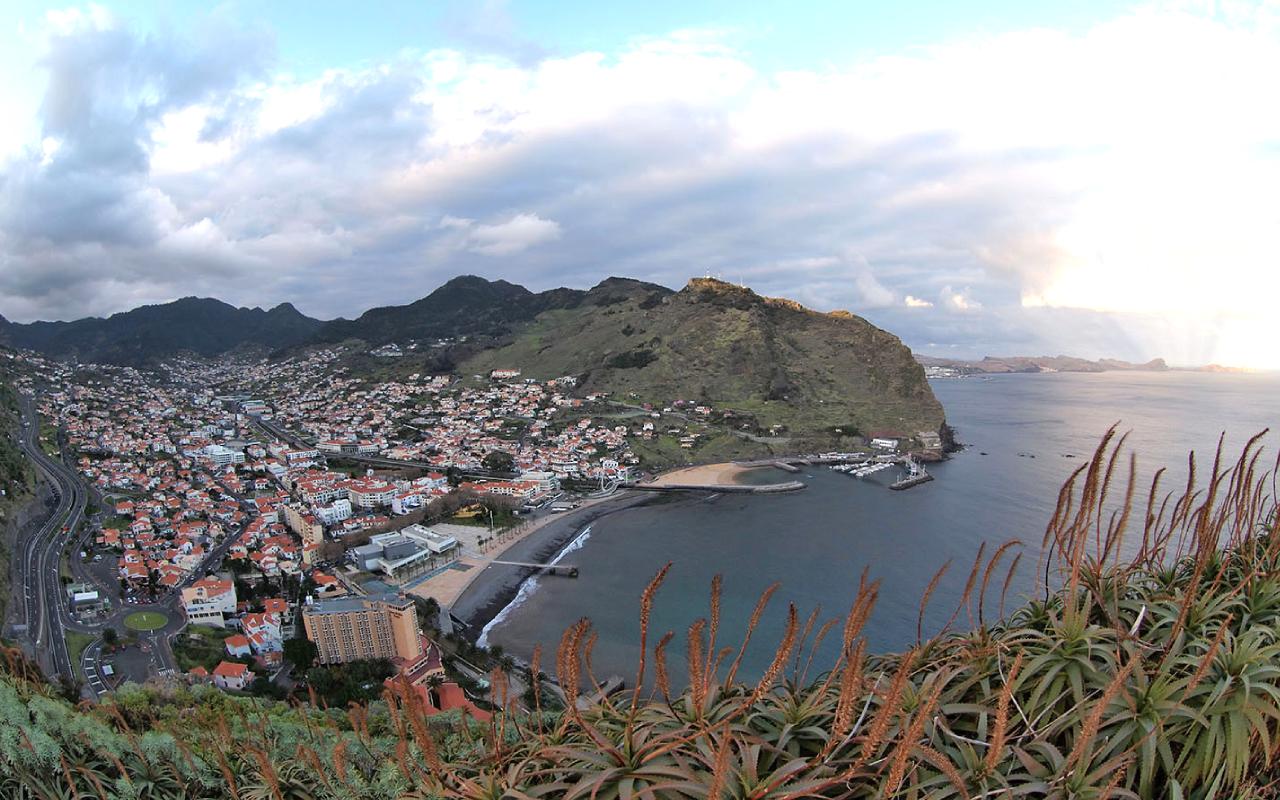
Machico
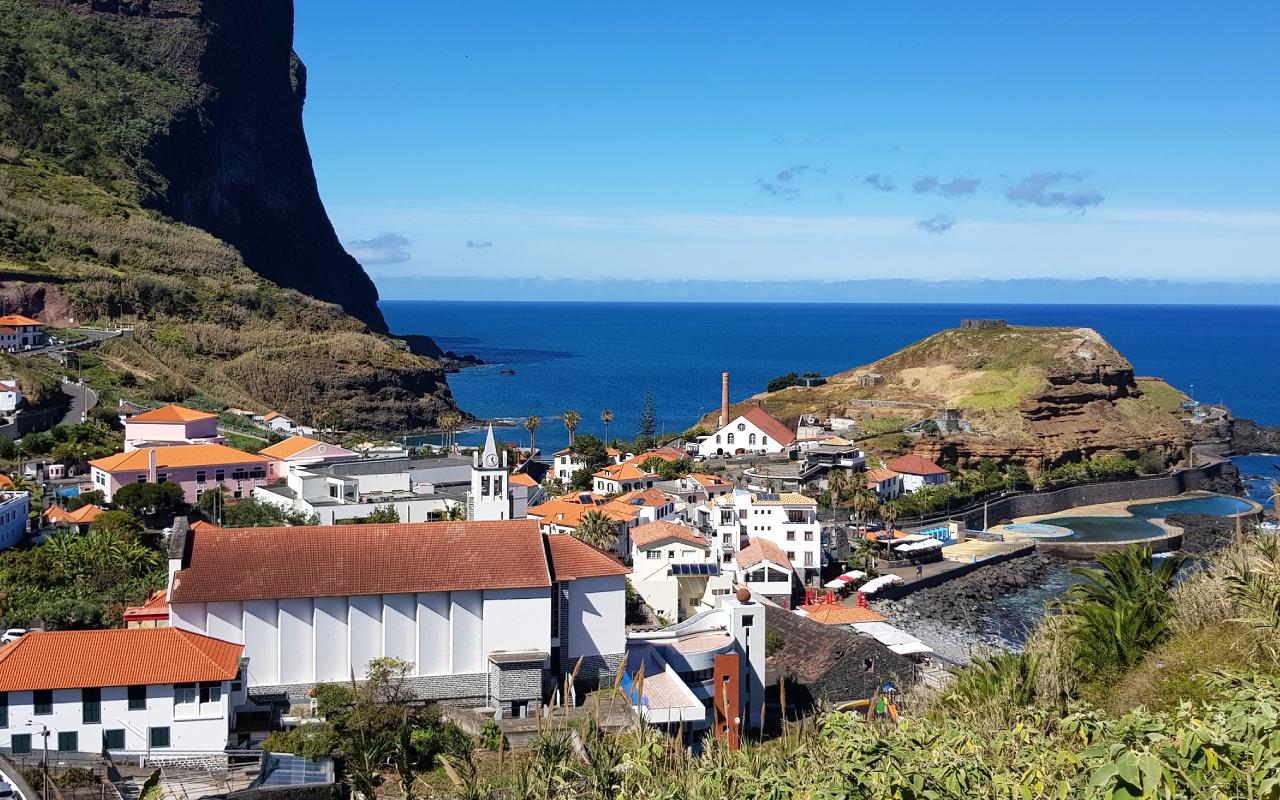
Porto da Cruz: This is a deeply satisfying finish town for a Vereda do Larano hike, because it pairs nature with culture. A standout stop is Engenhos do Norte, a rum/sugar-cane site described as a living testimony of Madeira’s sugar production history—built in 1927 and equipped with 19th-century machinery.
Porto da Cruz
Penha d’Águia: If you want another viewpoint or a different hike on a non-Larano day, Penha d’Águia is described by the tourism board as one of Madeira’s most important geological symbols, located between Porto da Cruz and Faial.
Penha d’Águia
Maiata Beach: A natural “post-hike decompression” option—known for quality waves and popular with surfers on the northeast coast.

Maiata Beach
This is a great way to build a “vereda do larano madeira” day into a fuller itinerary: hike first, then culture and coastline.
Where to stay near Vereda do Larano
Machico: Great if you want to wake up close to the trail and keep logistics simple (especially for an early start). It also works well if you want beach recovery time afterwards.
Porto da Cruz: Best if you like quiet north-coast vibes, surf culture, and you want a slower, more local feel after the hike (plus easy access to Engenhos do Norte).
Funchal: Best “base traveler” option: biggest transport connections and widest accommodation range, with straightforward bus options toward Machico and Porto da Cruz through SIGA services.
Vereda do Larano vs other Madeira hikes
To help you choose wisely (and set expectations), here’s how Vereda do Larano compares to two Madeira classics.
Versus PR8 (Vereda da Ponta de São Lourenço): PR8 is a famous coastal peninsula hike. Officially, it’s described as a 3 km + 3 km return route with moderate difficulty and an estimated duration of around 2:30 hours, with good trail conditions. It’s more “managed” and often busier, while Vereda do Larano feels more like a historic path carved into steep slopes.
Versus PR1 (Vereda do Areeiro): PR1 is a dramatic mountain traverse connecting Pico do Areeiro to Pico Ruivo (with iconic peaks and tunnels). Official information notes PR1 is a 7 km trail of moderate difficulty (with current access limitations noted), starting at Pico do Areeiro (1818 m) and involving tunnels and steep sections.
Compared to PR1’s high-altitude exposure and mountain intensity, Vereda do Larano is a lower elevation and generally less physically punishing—but still demands respect due to cliff exposure.
What makes Larano unique: It’s one of the few hikes where you can get “Madeira’s vertical drama” (cliffs + Atlantic) paired with a historic, lived-in route (levadas, villages, old infrastructure), without committing to a full-day mountain mission.
A 2026 hiking rule you should know, even if Larano is free
Madeira hiking changed in 2026: classified PR trails require a mandatory reservation, and the process runs through the official SIMplifica platform.
The official fee table published through SIMplifica lists €4.50 per individual trail (except special PR1 notes), plus bundled options like €9.00 for a day pass (for combined routes), €22.50 for 3 days, and €52.50 for 7 days.
Exemptions for classified trails include Madeira residents, children 12 and under, and people with disabilities (≥60%) with accompanying tutors, as described by IFCN.
Why mention this in a Vereda do Larano guide? Because many travelers pair a vereda do larano hike day with PR8 or PR1 on another day, understanding the 2026 system prevents last-minute surprises.
Final tips for an unforgettable Vereda do Larano hike
Start earlier than you think you need to: It makes parking easier (especially near Cabo de Larano access points), gives you calmer wind conditions more often, and protects your transport plan if you’re doing the hike one-way.
Check the right forecast: Madeira’s climate is mild, but microclimates mean the northeast coast can behave differently from Funchal, and exposed coastal sections amplify wind risk.
Decide on one-way vs. out-and-back before you arrive: If you’re driving, know your return plan. If you’re busing, screenshot schedules. This single decision is what turns “vereda do larano madeira” from a confusing search query into a confident day plan.
Respect exposure: Even when the hike is described as easy-to-moderate, the cliffside is real. If the wind is strong or you feel shaky near drop-offs, turn back—Boca do Risco is a worthy endpoint on its own.
Have an emergency mindset without hiking in fear: carry enough water/food, keep your phone charged, and remember that in an emergency, you call 112, clearly stating where you are, what happened, and who needs help.
Conclusion
Vereda do Larano is a Madeira hike that feels cinematic: a historic route stitched into steep green slopes above the Atlantic, culminating in the unforgettable Boca do Risco viewpoint and a cliffside traverse that defines “scenic coastal trail.”
Whether you’re planning a relaxed couples’ day, a solo adventure, or your first real coastal hike, the key to a great Vereda do Larano hike is simple: choose the route variation that fits your comfort with exposure, plan transport in advance, and hike with enough time to stop, breathe, and take photos—because on vereda do larano madeira, the views are the whole point.


-
 0115 Best Easy Treks in Nepal for Beginners and Families
 -
 02Best season for Everest Base Camp Trek
 -
 03Best Time to Go Hiking in Nepal: A Seasonal Guide for Trekkers
 -
 04Suchi Purja –Wife of Nirmal Purja aka Nims Dai
 -
 05Dubai desert safari outfit ideas
 -
 06Top Beaches in Sri Lanka
 -
 0710 Best Easy Treks in Nepal